My experience at PyConFr, 2016

Hi there!

Last week I got an opportunity to speak at PyConFr held at the Telecom Bretagne, engineering school and research center, in Rennes between October 13-16, 2016 and it was my first ever experience as a speaker at an international conference.

Fun fact: three things that people fear the most in this world are-
1. Death
2. Spiders
3. STAGE FRIGHT

So, naturally it was a daunting experience for me. I was probably the youngest there, I did not speak French, and I was surrounded by people who actually built this entire community of Python, which I was just entering. No pressure, there.

Honestly, I imagined myself to be completely alien to everything there, not knowing what to do, where to go, or whom to talk to. But the way things turned out over the next four days, was a 180 degree opposite of what I had thought and I am so glad it was that way.

The four day event kick-started with a two day sprint, where developers and contributors of various open source projects came together to code.

At the end of the two day sprint, we had an opening dinner-party-cuban-music-get-together for the conference. This was where all the attendees, speakers and the organizers gathered together for the first time, and it was so nice to meet them.
Specially the people I have known, but never met in person, like Alexis, who shared his experience as a tech speaker, having spoken at over 20 conferences before. Then there was Magopian, another Kinto member whom I hadn’t met before. He had some really useful tips and stories to share. I also met Nicole, who was working on the Warehouse project and coincidentally, she recalled spending 6 months in India as a part of the student exchange program. Naturally, we had a lot to talk about. I also met Sahil, Mathieu, Romain, and so many other friendly people who were extremely fun to talk to. I loved how welcoming the entire community was; people would actually go out of their way to make sure I felt at home!

The conference officially started the next morning with an opening ceremony by the organizers after which we had two jam-packed days of 5 parallel tracks, three for short/long talks and sessions and two for the workshops. And that’s when the real hustle began. People, hundreds of people, far more than expected, were rushing in the hallways to get to one of their favourite tracks. The fact that even the huge auditoriums were overflowing with people speaks volumes of what a great success the entire event was.

Even though most of the sessions were in French, I was glad to find that there were some talks in English as well. And the best part was that none of them overlapped, it was all impeccably managed.

The first talk I attended was by Bhargav Srinivasa Desikan, a GSoC intern who talked about performing effective topic modelling in Python using Gensium, an open source Python framework used for informational retrieval. He explained how we could effectively identify key topics in a large corpus of text documents which had heavy applications in both industry and the research sectors.

Then we had a talk by Sahil Dua, on the Python library, Pandas. He talked about data manipulation and indexing, with some really fun examples of statistics of number of goals scored by Ronaldo and Messi over the last 10 years. He explained various operations and functions which we could use and then implemented them over a live demo.

One really interesting session was conducted by Nicole Harris who talked about Warehouse, which is the next generation Python Package Repository, designed to replace the legacy code base that currently powers PyPI. She mentioned the achievements and the shortcomings of the project and discussed how they plan to move forward, inviting everyone to contribute to its success.

ipsha talk pyconFR.jpg

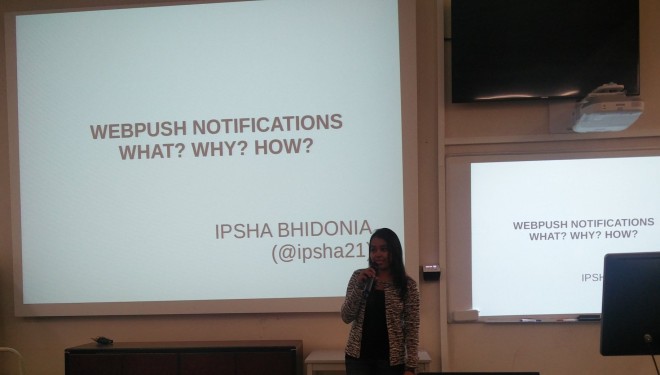
My talk on Web Push Notifications was scheduled on the last day. My relationship with this topic was from the Outreachy program, where my project was to enable real-time push notifications for Kinto. I talked about why web push notifications are important, what exactly are they, and how does the entire mechanism of push notification work, detailing the architecture and the technical building blocks that come into play.

There’s a great saying by Mark Twain that I love to share. He said, “there are two types of speaker: those that are nervous and those that are liars.

And I do not lie. 🙂

So even though I was extremely nervous to be standing there in front of so many people, having some familiar, friendly faces in the crowd was all the support it took, for me to make it through. And honestly, I was just glad I could complete my talk without collapsing. 😛

All in all, it was a great experience being there, interacting with some of the nicest people, hearing about their experiences, getting to know them and learning so many new things!

A million thanks to the Python community for giving me this opportunity to be a part of the conference.
I wish to thank AFPy and the Outreachy program for supporting my travels and accommodation. Without their support, I could not have managed to avail this opportunity.

And lastly, to the one person without whom none of this would’ve been possible. My Mozilla mentor, Remy Hubscher, who was deliberately not mentioned in the entire article because words simply fail to describe what an incredible support he has been over the last six months.

Thank you!
Until next time. 🙂

Kinto-Webpush: Step 1

The first step of implementing the Kinto webpush plugin is to be able to use Kinto’s user resource to store the user notification rules. This is what we’ll be looking at in this post.

Kinto webpush plugin aims at notifying a client, that has registered its webpush URL, whenever some modification occurs. In order to send push messages to the correct endpoint, on the occurrence of the correct event that triggers, we must have a way to store this user specific configuration of push credentials with their associated triggers.

We use Kinto’s user resource to achieve this task. First step is to register a resource named Subscription, and add two service endpoints to it:

  • User subscription list: notifications/webpush/
    This is where a user can add its subscription information, list all its subscriptions, or delete them. This is the collection path of the user resource.
  • Individual records: notifications/webpush/id
    This is where a user can modify its subscription or update any specific attribute of the subscription data, or delete any particular subscription. This is the record path of the user resource.
# Registering the resource.
@resource.register(name='subscription',
                   collection_path='/notifications/webpush',
                   record_path='/notifications/webpush/{{id}}')
class Subscription(resource.UserResource):
    mapping = SubscriptionSchema()

Once we have a resource registered with a collection path and a record path, we next have to define a schema of the records for this resource.
Our subscription record contains:

  • push attribute consisting of the push endpoint URL and the client’s key, and
  • trigger attribute consisting of the resource and the action on this kinto resource that triggers the push message.
SUBSCRIPTION_RECORD = {
    "push": {"endpoint": "https://push.mozilla.com",
             "keys": {"auth": "authToken",
                      "p256dh": "encryptionKey"}},
    "triggers": {
        "/buckets/blocklists/collections/*/records": ["write"]
    }
}

To define a schema for the above record we use Colander. A Colander schema is composed of one or more schema node objects, each typically of the class colander.SchemaNode, in a nested arrangement. Each schema node object has a required type and an optional validator. The type of a schema node indicates its data type, such as colander.String(). The validator could be an inbuilt one like colander.url or user defined, like in our case trigger_valid. We use this validator to ensure that our subscription record has a valid trigger action (like, read or write) and is registering a valid kinto resource (like bucket, collection, group, or record).

# Defining the schema
class KeySchema(colander.MappingSchema):
    auth = colander.SchemaNode(colander.String())
    p256dh = colander.SchemaNode(colander.String())


class PushSchema(colander.MappingSchema):
    endpoint = colander.SchemaNode(colander.String(), validator=colander.url)
    keys = KeySchema()


class SubscriptionSchema(resource.ResourceSchema):
    push = PushSchema()
    triggers = colander.SchemaNode(colander.Mapping(unknown='preserve'),
                                   validator=trigger_valid)

Now that we have registered a user resource and defined a schema for validating the records, all we have to do is use the correct HTTP verb on the correct service endpoint to add, modify, get or delete subscriptions.

For example, we can add a new user subscription by using the HTTP POST method on the endpoint /notification/webpush. The request body would consist of the subscription record having the push and triggers attributes and would look something like:

POST /notifications/webpush
< Request <
{
    "push": {"endpoint":"https://updates.push.services.mozilla.com/push/v1/gAAAAABXhkuIG...DnyV8iUiX3lVm","keys":{"auth":"by64sz1qJT...xl_g","p256dh":"BGRz...AX6EiUPuDefoC4"}}
    "triggers": {
      "/buckets/blocklists/collections/*/records": ["write"],
    }
  }

> Response >
{
  data: {
    "id": "a7546569-7583-4939-b9c9-71acb9321f82", 
    "last_modified": 1469023718589,
    "push": {"endpoint":"https://updates.push.services.mozilla.com/push/v1/gAAAAABXhkuIG...DnyV8iUiX3lVm","keys":{"auth":"by64sz1qJT...xl_g","p256dh":"BGRz...AX6EiUPuDefoC4"}}
    "triggers": {
      "/buckets/blocklists/collections/*/records": ["write"],
    }
  }
}

Similarly, we can use GET to list the user subscription list and DELETE to delete the user subscription. We can also modify or update an user subscription by using PUT/PATCH on /notification/webpush/id endpoint.

React.js and Redux

Okay. It’s official now. This has to be the week when I have said the most “I don’t understand this” ever in my life. But, this was also the week when I had the most “Aha!” moments in my head on finally getting a hang of things.

TIP: Do not get carried away by the fancy words and the syntax. The concept underneath is pretty awesome and easy to understand.

So, let’s get this started!
React-Redux. Lennon-McCartney. Mario-Luigi. Sherlock-Watson. Rosencrantz-Guildenstern. Pikachu-Charizard. You get it, right? They work best in combination.

Okay, so let’s look at React first.

WHAT IS REACT?

React is a JavaScript library built at Facebook with one aim: building large applications with data that changes over time. It allows us to express what our application would look like at any given point in time; it updates the view.

React is responsible for automatically managing the UI every time some data changes, which is conceptually equivalent to hitting a Refresh button.

React is all about building components, which are nothing pieces of JavaScript that returns a component’s tree. Using React, we just build reusable components which makes testing and separation of concerns easy. But that’s all it does, renders HTML.

The most interesting concept of React is the Virtual DOM. React renders a virtual DOM modeled around the real DOM by mirroring DOM’s current state. React is very smart. So when the virtual DOM changes, React takes only these changes to modify the DOM rather than rebuilding it from the ground up.
It does so by:
– running a ‘diffing’ algorithm to see what the changes are, and then
– updating the DOM with the result of diff.

COMPONENTS

Components are user developed JavaScript objects which represent HTML elements. They contain both the structure and functionality,
basically all the things user can see and respond to on the screen, and are without a doubt the bread and butter of React.

PROPS

When we use our defined components, we can add attributes called props. These attributes are available in our component as this.props and can be used to render dynamic data. Props can be used for passing data from a parent to a child which can be seen as a communication channel between different components.

STATE

State is best defined as how a component’s data & UI looks at a given point in time. State holds data which can change over time. It contains data that a component’s event handlers may change to trigger a UI update.

 WORK FLOW

  • React render a component with an initial state.
  • Change of state when some UI update happens, like say a button is clicked.
  • React re-renders the component to the virtual DOM
  • The new virtual DOM is compared with the previous virtual DOM
  • React isolates what has changed and updates the browser DOM


To sum up: whenever a component’s state is updated, React renders a new UI based on this new state and takes care of updating the DOM for us in the most efficient way.
That’s all great, but
who handles other things like actually updating the component’s state? Who deals with the state, and it’s logic? Well, this is where our buddy Redux comes in!


WHAT IS REDUX?

Redux is a “predictable state container for JavaScript appswith minimal API. It is a library that maintains the application state in one place, that lets the application know how to respond and modify a state when some action is triggered. And since it is not rendering anything, it weighs practically nothing.

What Redux offers us:
– A single store.
– Action and Action-creators
– A single rootReducer (composed of one or more Reducers)
– A single, over-simplified great life.

ACTIONS

Everything that happens, that changes something in our app, is an “action”. These can be caused by users, browser events, or server events. Every action must have an action.type and the rest is data.

Action Creators: These are function that, well, create actions. 🙂

export function newMessage(message) {
  return {type: MESSAGE_RECEIVED, message};
}

We dispatch these actions to the store using store.dispatch(newMessage(event.data))

But what happens when we need to perform multiple actions one after the other or when an action actually triggers multiple modifications?
That’s where redux-saga comes in the play but we will investigate that later 🙂

REDUCER

Reducers process the action and computes new states. The reducers has access to the current state, applies the given action to that state, and returns a new desired state.

const INITIAL_STATE = {
  messages: [],
  subscription: {},
};

export function blog(state = INITIAL_STATE, action) {
  switch (action.type) {
//this returns a brand new state after concatenating new message to the list
    case MESSAGE_RECEIVED: {
      return {...state, messages: [...state.messages, {
        date: new Date().toString(),
        text: action.message
      }]};
    }
    default: {
      return state;
    }
  }
}

NOTE:

  • The reducers are passed only the slice of current state that requires updating.
  • Reducers are pure functions. They just calculate a new state from the information given to them, it must not produce any side effects like API calls or routing transitions.
  • Remember: Your app’s state is immutable. That is why, reducers don’t modify the existing state, they compute and construct a separate piece of state which is formed using the data from the action: oldState + action = newState.
  • We return the previous state in the default case, for any unknown action.
  • For complex app, we may have multiple reducers managing their own slices of the global state, but all of them must be combined under a single rootReducer using combineReducers().
import { combineReducers } from 'redux'

const rootReducer = combineReducers({
  blog,
  //other reducers
});

All the returned states from different reducers are composed together to form the complete state of the application.

This is the beauty of Redux, any time an object is changed, we replace it, instead of editing it in place. It makes things a lot simpler and faster.

Also, the really awesome part about this concept is, since we are creating new states every time some changes occur, if we were to log out the actions that resulted in these new states, we could essentially be “time-traveling” back to the exact old state we were at, before those actions actually happened. If this isn’t magical, I don’t know what is. 🙂

magic

STORE

The whole state of your app is stored in an object tree inside a single store. This is the part of Redux that brings the action and reducers together. The store listens for actions, and uses the root reducer to return a new app state each time an action is dispatched. This complete new state, of course, goes into a single store.

const store = configureStore({
  blog: {
    messages: [{
      date: new Date().toString(),
      text: "App starting up"
    }]
  }
});

WRAP UP!

To sum it up, Redux provides predictable ways of maintaining our application’s state in one place. When we pair this with React, we get the complete package. We can now, not only change the state appropriately (Redux’s thing) but also view our automatically updated state without reloading the page. (React thing). Awesome, right? 🙂

Told you they complete each other.

Oh, one more. Winnie the Pooh and Christopher Robin!

The one with the Service Worker

I would like to begin this article with Service Worker – the unicorn, because that’s what it was for me when I first started reading about it. You know, a mythical creature, I was trying so hard not to deal with. But the truth is, it does exist. And for good!

If you are anything like me, then you might still think of service worker as a unicorn. I’m here to help transform that figure into a not-so-mythical creature. Actually, it now is The Dark Knight for me.

WHAT IS A SERVICE WORKER?

A service worker is a script that is run by the browser in the background, for features that don’t need a web page or user interactions. It is extremely powerful; it can be used to intercept network requests made by the user and hijack the connection to fabricate a different response than what was requested. Which means it provides complete control of how your app behaves in certain situations and determines how to respond to requests for resources of your origin. It runs in its own global script context, outside the page. It is event driven in the sense that it can terminate when not in use, and run again when needed.

Service worker includes some features like:

  • Push notifications
  • Background data synchronization
  • Intercepting network request
  • Programmatically managing a cache of response
  • Improving site’s performance

So basically, it works in the background, handling some very powerful stuff and it is here to make our lives better.
To summarize, a service worker is a silent guardian, a watchful protector. A Dark Knight.

Do you see the smooth transition from a unicorn to the Dark Knight? 😉

Also, the really cool part about service workers is that they allow offline experiences, which means that if you load a website once in presence of network, you can reload it while you’re offline.

BEWARE!

Service workers have all these amazing features, but with great power comes great responsibility (and in this case, security). And therefore, the sites registered with a service worker must be served over a secure connection. The good news is, Github pages are served over HTTPS, and that makes them a great place to begin.

Note:
– Since a service worker is essentially a JavaScript worker with no pages linked to it, it cannot access the DOM directly.
– Multiple browsing contexts (e.g. pages, workers, etc.) can be associated with the same ServiceWorker object.


SERVICE WORKER REGISTRATION

//make sure that Service Workers are supported by your browser.
if (navigator.serviceWorker) {
    navigator.serviceWorker.register('./service-worker.js', {scope: './about'})
        .then(function (registration) {
            console.log('Tadan!', registration);
        })
        .catch(function (error) {
            console.error('Uh-oh!', error);
        })
} else {
    console.log('Service Worker is not supported in this browser.');
}


We first register a service worker to control one or more pages that share the same origin. We can do this by using serviceWorker.registration() method which takes a parameter to tell the browser where the service worker JavaScript file lives (e.g., the path to the script that defines the service worker) and optionally, a second parameter which specifies the scope in which the service worker can operate
.

SERVICE WORKER LIFE-CYCLE

sw-lifecycle
Source of image: MDN

The life cycle of a service worker mainly has three stages:

  • DOWNLOAD
    A service worker is immediately downloaded when a user first accesses a service worker-controlled page. After that it is downloaded at least once every 24 hours.
  • INSTALL
    Installation is attempted when the downloaded file is found to be new. It can either be:
    – The very first service worker encountered by the web page, or
    – A new download, different from the existing service worker. (current worker and the new referenced version are bit-wise compared)
  • ACTIVATE
    – If it is the first service worker encountered by the web page, it is immediately activated after successful installation.
    – If a new version is found, different from the existing service worker, the browser waits (service worker is said to be in a waiting state) to make sure that there are no longer any pages loaded that are still using the old service worker. Once it confirms this, it will activate the new version.

And voilà! We now have an active service worker which can control pages, but only those opened after the registration is successful.
Note: Documents will have to be reloaded to actually be controlled by the service worker if they were open before its registration.

SERVICE WORKER UN-REGISTRATION

To unregister a service worker we can use unregister method of the ServiceWorkerRegistration interface. The service worker will finish any ongoing operations before it is unregistered.

navigator.serviceWorker.getRegistration().then(function(r) { 
  r.unregister();
});


TAKE A LOOK AT ALL THE SERVICE WORKERS

We can look at the dashboard that lists all registered service workers and shared workers in the Firefox browser by going to about:debugging in a new tab and clicking on the Workers tab on the left.
Alternatively, we access this from the Tools -> Web Developer -> Service Workers.

So that’s it! Now that we know a little about service workers, we shall see how they fit in the Web Push movie (starring The Dark Knight) in the next article. Till then, happy coding! 🙂

PS: Life would be infinitely simpler if we were all unicorns.

Realtime Push Notifications for Kinto!

Hi reader!

This week, I’m going to introduce the basic concept of my project, “Realtime Push Notifications for Kinto.”

Disclaimer: Monsters, old age, death, SPIDERS, there are already too many things in the world to be scared of, open source projects should not be one of them. So this blog post is my humble dedication to all the new comers out there who are intimidated by the technical stuff or as I like to call it “the alien language”.
I’ll try my best to keep this article as simple and as far from the alien language as possible. All the non-technical people can adore me, and all the technical people can point out my mistakes and tell me what an idiot I am! 🙂

Okay, let’s get started!

First things first!

What are Push Notifications?

Push notification is a type of client-server communication where the request for a given transaction (transmission of data) is initiated by the server, and not the client.

There are generally two scenarios:
1. Pull: The user (client side) requests some sort of data from the web server, and the server responses to the request by providing the desired information.
2. Push: In case of push notifications, the server is initiating the transaction, which is very common in cases where the client has opted for receiving certain timely updates from applications, like getting a live sports score or receiving messages on web chat, or online betting, auctions, etc.

What is a Push API?

Push API (application programming interface, i.e. an interface between different software programs, that facilitates their interaction) enables the user to receive messages pushed to them from a web application server, even when the application is not loaded, or not running in the foreground.

Basic working:
1. Client or the user agent subscribes to certain “channels” in advance. That is, they give their consent for receiving push notifications from a particular web application.
2. When new content is available on these channels, the application server pushes that information to the client.

Simple, right? 🙂

Now, let us look at some of the dreadful technical terminology:
(Oh, how I have hated these terms for the last few days, only to finally understand them and realize that the world is not a cold, harsh place after all! 🙂 )

  • Service worker: Formally, a service worker is a script that is run by your browser in the background, separate from a web page, for features that don’t need a web page or user interactions. They allow access to push notifications and background sync APIs. So, to receive push notifications, a service worker is installed by a web page, which remains active in the background even when the tab is closed.
  • Push subscription: The web page having an active service worker may subscribe to a push service. Each subscription is unique to a service worker. The resulting push subscription includes all the information that the application needs to send a push message:
    1. An endpoint (which is a capability URL; where the data is to be sent) and,
    2. The client’s public key to encrypt the data for safe and authentic transmission.
    NOTE: Each browser has its own unique URL. This way a push message can be sent to a particular person (e.g new message on Facebook).
  • Push message: The entire game is of the app server trying to send data to a web page. This push message is delivered to the service worker associated with the push subscription to which the message was submitted.

Okay, so, now that we know some terminology, we can act cool and proceed further to look at the push workflow. 🙂 Here’s a flowchart of how the things work. Follow it up with the step wise explanation below it.


push noti
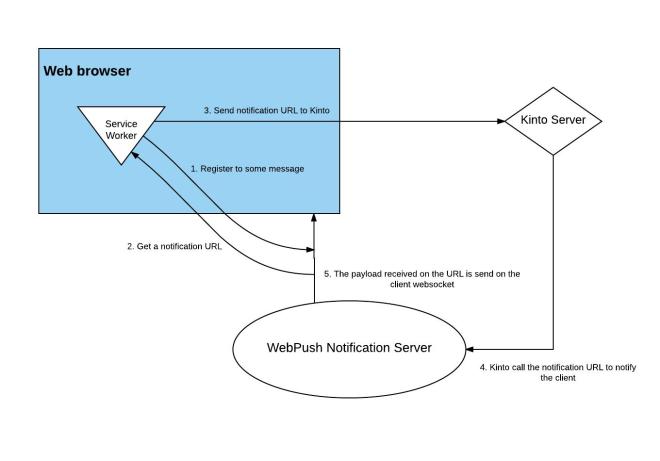
The entire process or workflow of Push Notification can be explained in a few simple steps:

  1. Request permission for web notification. Having a permission is simply a web page saying, “Hey, I would like to receive realtime notifications from this web application”.
  2. Register a service worker with the WebPush service, to control one or more pages that share the same origin.
  3. Subscribe to push service. The push subscription has an associated endpoint URL and client generated public key which is used in encrypting the push message.
  4. Retrieve the notification URL from the WebPush server. This endpoint URL is where the push messages are received, and then routed to the client that has subscribed for the notifications.
  5. The notification URL and the public-key is sent to our buddy, Kinto. This information is stored at the server, and is used when a push message needs to be sent to a push subscriber.
  6. When a trigger is initiated (such as modification of data) that generates a push message, the Kinto server encrypts the data using the public key and calls the notification URL to notify the client.
  7. Webpush server routes the message to the proper client websocket without the ability to actually read its content.
  8. On the client side, the service worker sets up a push event handler to respond to the push message being received.
  9. The handler may then respond to the push message by firing a system notification that pops up with the pushed message.
  10. The workflow cycle actually ended at point 9, I just wanted to add this point to round it off to 10. 🙂

And just like that, you receive realtime notifications from a web application. *phew*

That’s it from my side for this post. See you next week! 🙂

Cheers!


Outreachy!

Hello there!

I have been meaning to start a blog since a long time and what better reason to start one than being an Outreachy intern! 🙂
I will be using this blog to share my three months’ experience as a Mozilla intern, contributing to the project “Realtime Push Notification for Kinto”.

Let’s look at it all one by one!

What exactly is Outreachy?

Outreachy (previously OPW) is a wonderful initiative taken by GNOME Foundation that provides the stepping stone for the new comers in the world of Free and Open Source Software (FOSS). The program, organized by Software Freedom Conservancy, offers a three-month paid, remote, and mentored internship to women, trans men, genderqueer people all around the globe, as well as to the US residents who belong to racial minority groups. Outreachy has two rounds annually, and homes various FOSS organizations.
If you like to code, and want to contribute to impacting the lives of people around the globe, Outreachy is the thing for you. Do not hesitate to apply!

My organization, Mozilla!! 😀

Mozilla is a nonprofit global community that believes “the Web should be open and accessible to all.” Being a part of an organization that believes in the importance of universal web literacy has been an incredible start to my journey in Open Source. Mozilla has some really cool projects that aims at empowering the users by creating open source product. Mozillians are the nicest and the most helpful people you’ll meet, and they are committed to make your experience in FOSS, as a beginner, less scary. 🙂

Kinto!

Kinto is the Mozilla open source product that I would be working on, for the next three months. It is a minimalist JSON storage service where client applications can store, share, retrieve and sync data. It is currently used as a backend for Firefox OS applications and for Firefox and Fennec updates in the Go Faster projects. To know more, check this out!

Kinto has an amazing team of Mozillians and voluntary contributors, and I shall be collaborating with them throughout my internship. I had a meeting with my mentor, Remy Hubscher, in the first week and we decide to build a road-map for the project together. I shall be meeting the rest of the team soon!

My project aims at enabling and implementing realtime push notifications for Kinto. More details on the project in the next blog post. Stay tuned! 🙂